Programming or scripting is used to make this attribution into a very usable, visually pleasing product. We have created the Python Insights blog series to help other Python users by providing solutions to common problems and handy hints.
Have you had trouble understanding how to access your polygon data from within python, or how cursors can be established and used in ArcGIS? Our second instalment in the series will help explain how and when to use them to successfully run your scripts.
This is intended as an introductory level tutorial to arcpy and python. Some pre-existing python comprehension and knowledge of arcpy is required.
The use of python is integrated into all aspects of ArcGIS. All tools and functionality can, in one form or another, be called upon and made use of in python. This has been made readily available to ArcGIS users in the arcpy library and module.
To utilise python in the everyday use of ArcGIS, a user will need comprehension in the basic language of python and how the tools and functions in ArcGIS are called upon and made use of in a python environment. As a starting reference point, the ArcGIS user’s manual is a wealth of information that can guide a user through the basic coding and language of ArcGIS in python.
A common theme and daily use in the querying of vector shapefiles involves the selection of particular attributes or locations in a shapefile for editing, updating and use in further analysis. This can be simply done within an ArcMap session through SQL queries, selections and edit sessions, but in a python environment this can become difficult to perform. However, with the use of Cursors and Dictionaries, this can be done all within a few lines of code. Also, any code snippets and created variables can be used and re-used again and again within a script.
Use of Cursors in ArcGIS Python
One of the more useful tools that should be a high priority take home lesson for new comers to the arcpy module, is the use of cursors. Specifically how they interact with a shapefile or database and how they can be leveraged to minimise processing times.
A cursor in python is referred to as a data access object. It can be used to access the data table in a shapefile, standalone dbf or csv, to read and write entries. Cursors come in three forms; Search, Update and Insert. As their names suggest,
- Search Cursors are used to iterate through the rows in a shapefile or other database table and search for selected values.
- Update Cursors are used to iterate through the rows in a shapefile or other database table and update, remove or alter selected entries.
- Insert Cursors are used to iterate through the rows in a shapefile or other database table and insert rows and entries to the end of a database table.
Insert Cursors
Insert cursors are one of the simpler to use cursors in the arcpy python environment. In the below example (Figure 1) we want to build a five times multiplication table as a database table. This could potentially form a base for future calculations as a lookup table, for example in statistical analysis we can build probability tables or z-score tables.

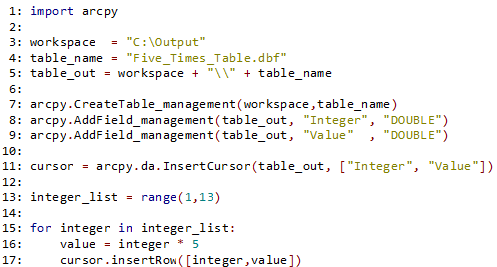
Figure 1: Insert Cursor Example
Initially we import the arcpy module, specify the workspace, table name and full table path location. Next we create the database table and add two fields for our base integer value and multiplication factor. From this initial setup we then define the cursor variable, as an InsertCursor, and point this to the table we have created and the two fields we have added.
It is important to note that to make use of any cursor, from ArcGIS 10.1, we should call upon the data access tool group from the arcpy module (arcpy.da). Earlier versions of ArcGIS did not use the ‘da’ call out. It can be left out, but a lot of the functionality is lost. Hence it is always suggested to use the full ‘arcpy.da’ before any cursor is used.
The two fields we have placed into the InsertCursor are placed into a python list or array. Basic pythonic rules are followed when using lists in an arcpy module. That is, the first position in the list is referred to as 0, then second is 1 and so on. Hence to call on the field “Integer” this is 0 and “Value” is 1. This nomenclature and use of python lists in cursors will be expanded upon later.
Next we create a number list from 1 to 12 and then use this within a ‘for’ loop. A for loop is useful when we want to iterate through a range of numbers or values within a list. This loop will iterate through each integer value in the list, at each integer it will times this by 5 to get a value.
Lastly we call on the InsertCursor variable we created earlier to insert a row. This row will populate the “Integer” and “Value” fields with their respective entries.
Search Cursors
The next type of cursor types, Search Cursors, are an extremely useful function in arcpy, as they can cycle through a table and display out the entries and values we want to view. The simplest way of using a search cursor, as outlined in Figure 2, is to display each entry that matches a search criteria.
In this example we are looking through a roads layer to look at routes and names. The SearchCursor is called in at line 5 to point to our road shapefile and to look at the “Route” and “Name” fields within the layer. This is done in a ‘with’ statement, which establishes a flow-structure that states to use a search cursor as the variable “cursor” to perform a function.
This function for our example is to cycle through the polygon, row by row, using the cursor, to display the values of “Route” and “Name”. Here we see the use of python lists in a cursor, where we call on row[0] and row[1]. This is essentially calling the entries in the given row for our two fields.

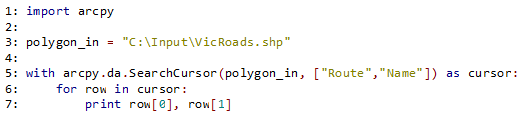
Figure 2: Search Cursor Example
A second use of search cursors, as seen in Figure 3, is to cycle through the road layer and search for particular words or entries. Here, firstly we have established a road name list. Then using the SearchCursor pointed at our layer and the two fields of “Route” and “Name”, we want to populate a second list with the relevant route numbers that correspond with the road names in our list. Within a ‘with’ statement, we establish an empty list and then use a ‘for’ loop to go through each row in the cursor.
Next we use an ‘if’ statement to search for our key words. Here we use what is called ‘list comprehension’ to combine several lines of code and loops to search for our key words. This code block states that if and word in the “Name” field matches any word in the road name list, then we append its route value to our empty route list.

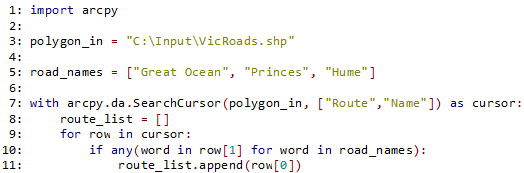
Figure 3: Using ‘if’ statements to search for key words
Update Cursors
The last of the three cursors is the Update Cursor. This possess more functionality than the other two cursors as you can search and edit rows and individual fields very easily. Be careful in its use as any edits done are not reversible.
The easiest way to make use of an update cursor is to look through individual rows, perform a field calculation and update any entries if necessary. In Figure 4 we are still working with our roads layer as used before. From line 5 we call on the UpdateCursor in a ‘with’ statement to look at the layer and the three fields of “Road_Type”, “Name” and “Full_Name”. We want to iterate through each row and update the last field with the full road name.
The equation at line 7 for row[2] is simply concatenating the string fields together to create the desired entry, but if we are using integers or float numbers we can as easily perform calculations.
Lastly we need to explicitly update the row with a statement. This is done to save any edits you have calculated. Alternately if we are wanting to delete rows based on some statement, we can use a deleteRow statement to remove a row.


Figure 4: Update Cursor Example
For more on the structure and use of cursors in an ArcGIS environment refer to the ESRI online guide at: http://pro.arcgis.com/en/pro-app/arcpy/get-started/data-access-using-cursors.htm
We hope you have enjoyed our second Python Insights blog and have learnt some skills that you can apply in your own workplace. Click here for Part 3, the final part of Python Insights!
For further information, please contact Spatial Vision at info@spatialvision.com.au
Harmen is a skilled analyst and modeller with over 6 years of experience in Geospatial Analysis.He has a strong background in the ArcGIS environment, Python scripting and the application of automation in modelling processes for large datasets and series.This has most recently been applied in the evaluation and processing of environmental works program data across Victoria for the analysis of works size and alignment to best management practices.
- When to Raster vs When to Vector? A worked example - May 4, 2022
- Mapping the Future of Farming - August 9, 2019
- Great Ocean Road Erosion Impacts - January 10, 2019