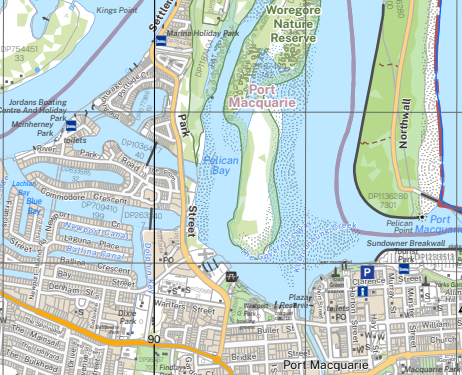
 Now that you know how to choose a map, let’s learn how to use it! Darren Edwards of Trail Hiking Australia knows a thing or two about maps, and is here to share his knowledge. With some basic knowledge and a good ol’ compass, you’ll be steering the way in no time.
Learn how to use a map with Darren below.
Using a map
You have your map and understand how to read it, great. Now you are ready to use it. If your phone battery has died the first thing you will need to do is to figure out where you are. Once you know this you can then determine where you are going and the best route to get there.
Finding your location
You can find your current location by matching what you can see in real life with what is on the map. This is called Taking a Magnetic Bearing of a Distant Object. You can forget about your map for now as all you want to do is capture the magnetic bearing of the landmark from your position.
To find your location on a map, take a magnetic bearing of at least two (preferably three) prominent landmarks (peaks, creeks, valleys, ridges, spurs, saddles, power lines, farms, roads, etc.), which you can positively identify on the map using a compass.

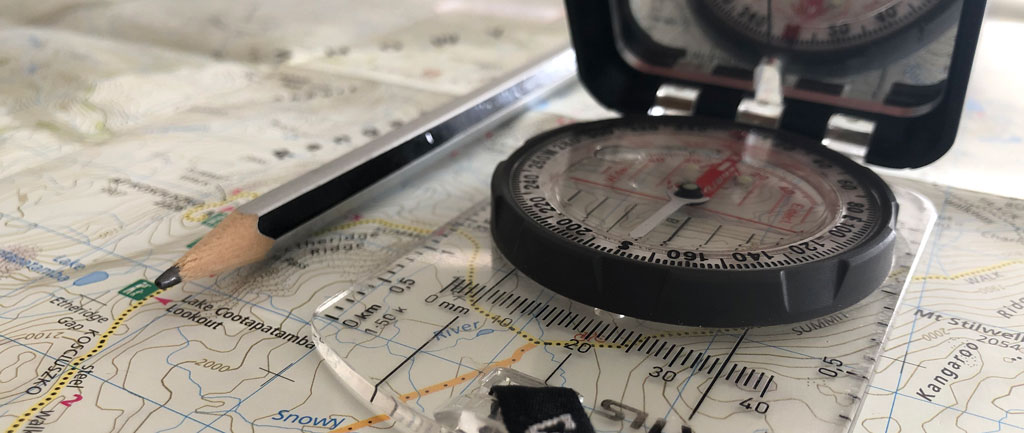
Raise the compass to eye level so that you can clearly see the landmark in front of you. Then point the ‘direction of travel arrow’ on the compass directly at the object you wish to take a bearing of. Rotate the bezel (the rotating part of the compass) until the north end of the floating magnetic needle (usually red or blue) lines up between the ‘N’ indicator, luminescent dots or lines which are on the flat surface of the bezel or directly over the red orienting arrow (depending on which brand of compass you are using). Read the magnetic bearing directly from the bezel opposite the bearing line or direction of travel arrow. This is the magnetic bearing of the landmark. The accuracy is usually within +/- 5 degrees depending how carefully you hold the compass. A sighting compass can improve the accuracy (or reduce the error) to within 1 degree. Now adjust your compass (rotate the bezel) by adding the magnetic variation (as indicated on the map) to the bearing you have just taken. This is called converting the magnetic bearing to a grid bearing. Refer to What is Magnetic Variation (Declination)?
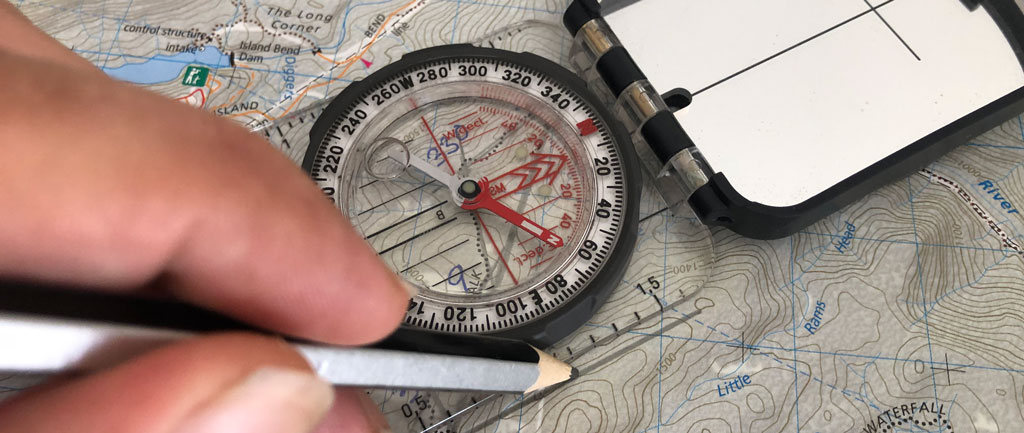
Lay your map out on a flat surface and locate the landmark you have just taken a bearing from. Without adjusting your compass bezel, position your compass on the map so that direction of travel arrow is pointing at the landmark. Align the side of the compass with the landmark and slowly rotate your entire compass (not the bezel) so that the magnetic needle is facing north, directly over the orienteering arrow. When rotating the compass make sure the side of the compass is always touching the distant landmark.

Draw a straight line on the map starting from the landmark (use the side of the compass to draw the line). You are located somewhere along this line. Take another bearing from a different landmark, ideally at 45 and 90 degrees from the first landmark. Convert the magnetic bearing and draw the next line on the map. This second line should intersect with the first line. If your bearing landmarks are high, narrow, not too far away, lines are straight and your compass alignment good, then you are likely to be within 100 metres of the location shown by the intersecting lines. If not, you could be located within a radius of up to 300 metres. If you have to walk out a specific spur or creek then the accuracy can be critical. You could walk up the wrong spur and be forced to stop and camp overnight due to night falling. If you take a bearing from a third object and draw in another line on the map, you will usually end up with a triangle being formed by the three intersecting lines. You have now identified your location on the map.
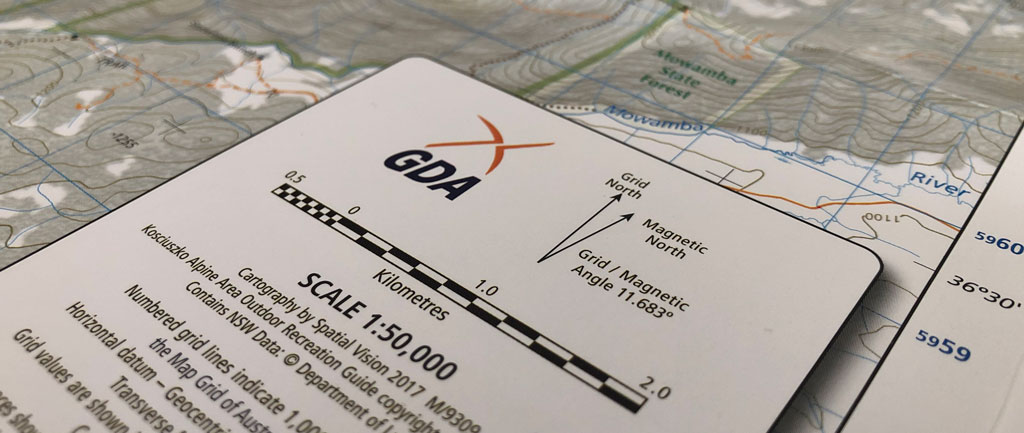
What is Magnetic Variation (Declination)?
Every topographic 1:25000 CMA map in Australia shows the magnetic variation (or declination) for that specific area of travel. If you marked up a map of Australia showing all these variations, you would end up with the map which shows that the magnetic variation varies significantly across Australia. It is always a good idea to check the publication date of your map. The reason for this is that the magnetic variation is very slowly moving easterly as noted on the bottom of each map. Remember to allow for the change in magnetic variation depending on where you are going to walk. I always find it beneficial to look up online resources as they will show you current variations for your area of travel.
When converting a magnetic bearing to a grid bearing (the real-world to the map), I use a very simple rule. If you take a bearing from the real-world and physically ADD the compass to the map, then you need to ADD the variation to the bearing you have just taken. Eg. If you took a bearing of a distant object in Sydney as 78 degrees magnetic, then you would add 12 degrees to give a true bearing of 90 degrees – due east of your present location. This is because the Magnetic North is offset by 12 degrees east of Grid North in Sydney.
Taking a Point to Point Grid Bearing to find your direction of travel
Now it’s time to figure out how to get where you want to go This is called taking a grid bearing. If you just want to go from one point to another, all you need to do is to plot that single route, A to B on your map. If there are several points you need to plot (often due to terrain), you will want to plan your route in such a way that you visit all the points in the shortest and safest possible manner.
To take a grid bearing between one point, A on a map and another point B, lay the edge of the compass along a line between the two points with the direction of travel arrow pointing towards your direction of travel. This may seem obvious, but it is very easy to get it wrong, especially under pressure. Rotate the bezel until the north orienting arrow on the bottom of the rotating bezel is pointing to the top of the map (Grid North). Compass manufacturers make it easier for us by also providing lines on the bottom of the compass which are parallel to the north orienting arrow. This allows us to reduce the parallax error when trying to visually align one of these lines to become parallel to the vertical grid lines. The grid bearing can now be read over the bearing (index) line. This bearing isn’t of any use however until it is converted into a magnetic bearing that can be set on the compass so that you can start walking towards the object at Point B.
When converting a grid bearing to a magnetic bearing (map to the real-world), I use a very simple rule. If you take a bearing from a map then physically SUBTRACT the compass from the map, then you need to SUBTRACT the variation to the bearing you have just taken.
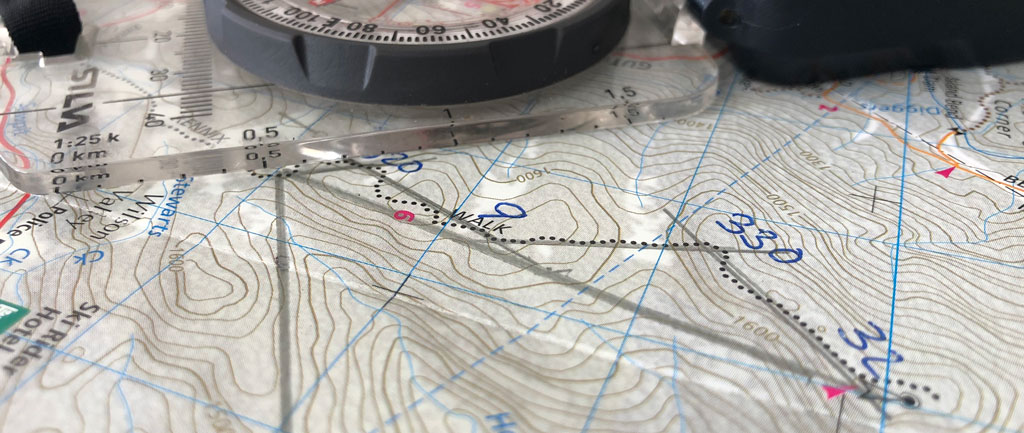
Write each bearing on your map next to the corresponding lines you have drawn.
Travel to each of your plotted points by holding your compass flat in front of you with the direction of travel arrow pointing forward. Rotate the compass bezel until the magnetic bearing you wrote on your map can be read along the bearing line of the compass. Now rotate your body slowly until the north end of the magnetic needle is over the orienteering arrow (pointing to north) on the bezel. You will now be pointing along the bearing, ready to start walking.
Trying to walk in a straight line along a magnetic bearing will generally be difficult due to finding trees and other obstacles in your path or if you have a tendency to veer to the left or right. It becomes easier if we split the walk up into a series of shorter checkpoints (and recheck your bearing at these checkpoints along the way).
A simpler and easier method which usually saves time and energy is to take a bearing of a large prominent landmark that you can see from a distance (preferably up high when walking in hilly country so that you can check your location whilst walking along the easiest route towards this object). The object could be either natural (Eg. like a mountain or large prominent rock or tree).
Before walking from point-to-point, also take note of the maps scale so that you can also estimate your travel time. If you are taking longer than you expected to reach the next feature, you should stop to recheck your map as you could be seriously off course before you realise it.
Learn more about using a compass here >
That’s a wrap on our Choosing & Using a Map series with Darren Edwards. Visit Trail Hiking Australia for more tips, tricks and ideas for your next adventure, or check our our quality map range at SV Maps.
- Getting the most out of your GIS strategy & investment - July 24, 2024
- Climate Change & Homelessness: Understanding the Connection - July 24, 2024
- Navigating the complexity of geoscience data analysis - July 24, 2024