By Spatial Vision Geospatial Analyst, Jack Batson
In the world of Geospatial, the two dominant players in the GIS software, ArcGIS Pro and QGIS, both offer Python libraries, which enable a user to integrate their respective functionalities into a Python code. As one of the most common scripting languages used in GIS, Python can be invaluable for streamlining otherwise arduous manual tasks such as advanced data management, geospatial analysis and map production.
Even if you have a good understanding of base Python, both ArcPy and PyQGIS require a bit more learning to know what you’re doing. If you’re familiar with one of these libraries and want to get into the other, or even if you’re starting from scratch, here, we will outline some of the key differences between the way these libraries operate.
Esri’s ArcGIS Pro seems to dominate the market share of GIS software, and, at least anecdotally, I have found that most people in the geospatial industry have some knowledge of ArcPy. As Esri controls and owns the ArcPy library, they have detailed and robust reference and scripting help available online, including code examples and tutorials. This makes it quite easy and accessible to begin to learn ArcPy and to troubleshoot problems you may encounter. That is, of course, if you have an ArcGIS Pro license, which doesn’t come cheap these days!
QGIS, on the other hand, is entirely free, and as a result many are looking to QGIS as a cost effective way of solving spatial problems. Learning to use PyQGIS, however, can feel a bit more daunting. PyQGIS’s help and documentation isn’t as seamlessly integrated to the QGIS software as ArcPy is, however there is still a detailed PyQGIS ‘Cookbook’ available online, and there are tutorials and examples available online – you just have to look a little harder to find them.
Accessing the Python Console
QGIS
In the QGIS menu bar, go to Plugins > Python Console.
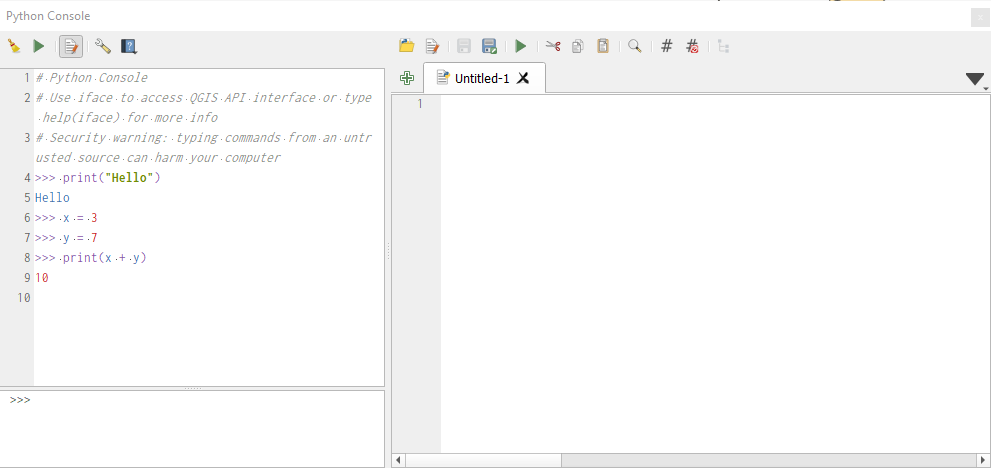
You will be greeted by a little something like this. You can write individual commands and send them to process one at a time from here, similar to the Python Console in ArcGIS Pro.
However, its more likely that you’ll want to write a script, edit it, and then run it to see how it goes. to do this, click the Show Editor button in the top bar.
The Python Console will then split, and a new untitled Python script will appear for you do do with as you please. In the top bar, you can open existing .py files to run, save your script, Run your script, etc.
ArcGIS Pro
In the top ribbon, go to Analysis, and in the Geoprocessing section you will see Python. You can either choose to open a new Python Notebook, or go directly to the Python console by hitting the drop down arrow and selecting Python window, which I will be using for my demonstrations from here on out.
Scripting
Starting a Python script
For the sake of simplicity, the examples I provide will be as though they are run through the Python console of their respective GIS program. This is the simplest way to write and run a script, as no modules need importing!
Examples
By running though a few examples of some common actions that you might incorporate into a Python code, I will highlight some of the differences in the way that ArcPy and PyQGIS operate:
ArcPy
If the layer is open in the ArcGIS Pro map, you can just define the name of the layer as a string.
layer = “countries”
You can also define the layer based on its file location – even if the layer isn’t open in your ArcGIS Pro Map.
layer = r”C:\svproject\pyqgis\data\countries.shp”
If you wanted to add your layer to a map, there are a few extra steps compared to PyQGIS. ArcGIS Pro is project based, and as you can store multiple layouts and maps in a single project, you must specify which map before adding.
layer = r”C:\svproject\pyqgis\data\countries.shp”
Here is a good time to point out the modules in ArcPy. Classes and functions of a similar theme are stored in modules, such as the Mapping module used here – arcpy.mp
# We use the class ‘ArcGISProject’ from the mapping module to create an object.
aprx = arcpy.mp.ArcGISProject(“CURRENT”)
# activeMap creates a Map object based on whatever map is open in the user interface.
m = aprx.activeMap
m.addDataFromPath(layer)
PyQGIS
Compared to ArcPy, PyQGIS relies on classes and objects a bit more. For example, to be able to perform most tasks, the file path to the dataset won’t do. Instead, you must create an object using the ‘QgsVectorLayer’ class.
layer_path = r”C:\svproject\pyqgis\data\countries.shp”
# Assign a layer as a variable without adding to map
layer = QgsVectorLayer(layer_path, ‘countries’, ‘ogr’)# Assign a layer as a variable and add it to the map
layer = iface.addVectorLayer(layer_path, ‘countries’, ‘ogr’)# Assign the active layer on your QGIS map as a variable
layer = iface.activeLayer()
Accessing field information
ArcPy
Getting field information requires use of the function arcpy.ListFields. You’ll notice that this function isn’t part of any module. This then creates a list of field objects, from which you can extract properties such as the name and data type.
layer = ‘countries’
fields = arcpy.ListFields(layer)
for field in fields:
print(field.name + ” ” + field.type)
PyQGIS
Another way of saving a layer to a variable. Here we use the QgsProject class to save the QGIS document to a variable, and then list the layers in the map. It is filtered to layers with the name ‘countries’, and as it is a list, we extract the first (and only) item in this list.
project = QgsProject.instance()
layer = project.mapLayersByName(‘countries’)[0]
As the layer in QGIS is defined as a Vector Layer object, it has its own property named ‘fields’. To access layers, you call on this property, instead of executing a function.
field_list = layer.fields()
for field in field_list:
print(field.name() + ” ” + field.typeName())
Accessing features and their attribute values
ArcPy
In ArcPy we do this using a ‘cursor’. You must dictate the fields that you wish the cursor to read from the data source beforehand. Then once iterating through the cursor, you must refer to the field based on its index specified in your input list.
# Print names of each country in the layer.
fields = [“NAME_LONG”, “TYPE”]
cursor = arcpy.da.SearchCursor(layer, fields)
for row in cursor:
name = row[0]
print(name)# Filter these names to sovereign/countries only
fields = [“NAME_LONG”, “TYPE”]
print_list = [“Sovereign country”, “Country”]
cursor = arcpy.da.SearchCursor(layer, fields)
for row in cursor:
name = row[0]
if row[1] in print_list:
print(name)
PyQGIS
PyQGIS uses the method getFeatures on a QgsVectorLayer object. This essentially creates a nested list which can be iterated through, and all fields can be accessed.
# Print names of each country in the layer
for feature in layer.getFeatures():
name = feature[“NAME_LONG”]
print(name)# Filter these names to sovereign/countries only
print_list = [“Sovereign country”, “Country”]
for feature in layer.getFeatures():
name = feature[“NAME_LONG”]
if feature[“TYPE”] in print_list:
print(name)
Creating a new field
ArcPy
Instead of being gung-ho and trying to add the field, no matter what, it can be a good idea to check whether the field name already exists first. First, we create a list of the field names from the ListFields function, and then add an if statement to check whether our new field name is in the list or not.
new_field_name = “AREA_SQKM”
field_name_list = [field.name for field in arcpy.ListFields(layer)]
if new_field_name not in field_name_list:
arcpy.management.AddField(layer, new_field_name, “DOUBLE”))
print(f”Field {new_field_name} created.”)
else:
print(f”Field {new_field_name} already exists.”)
PyQGIS
In PyQGIS, the data provider is the connection to the underlying file or database that holds the geospatial information to be displayed. We need to access the data provider to edit certain properties of the file, such as the fields.
To check if the field exists, we use the fieldNameIndex function. This takes a string and tries to find it in a list of field names, and returns its location in the list. If it cannot find the string (ie. this field name does not exist), it will return -1. Therefore, we can use this function to check if the field name already exists before proceeding to create it.
dp = layer.dataProvider()
new_field_name = “AREA_SQKM”
if dp.fieldNameIndex(new_field_name) == -1:
dp.addAttributes([new_field])
layer.updateFields()
print(f”Field {new_field_name} created.”)
else:
print(f”Field {new_field_name} already exists.”)


